There are countless reasons why you could have an unsaved Excel document. These reasons may include virus or malware attack, Mac unexpectedly shutting down, program crash, or formatting the hard drive. If you’ve experienced any of this, there’s no need to panic. Recovering Excel files on Mac is a simple process.
In this article, you will learn how to recover unsaved Excel files on Mac through default features and via the Excel built-in tool. In addition, how to recover these Excel files through automatic backup and using third-party software will be explained.
How to Recover Unsaved Excel Files on Mac via Default Features
Recovering Excel files on Mac is not a stringent process. Here, how to recover Excel files on Mac through default features will be explored.
Retrieve Excel from the Temporary Folder
Whenever you are trying to find any unsaved Excel file on your MacBook, try to retrieve it from the temporary folder.
The following are procedures to follow:
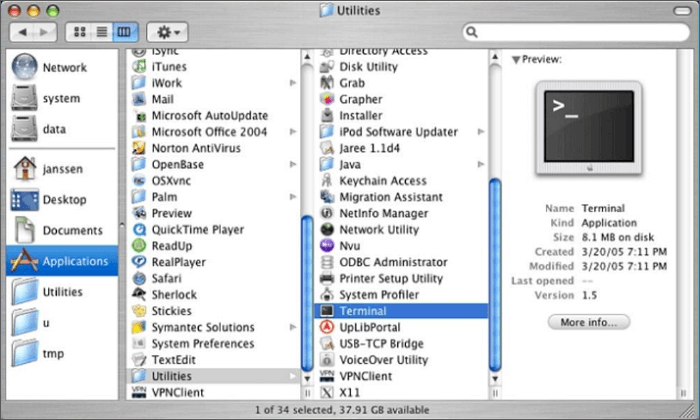
1️⃣ Go to Applications, click on Utilities, and then choose Terminal.

2️⃣ Type and open $TMPDIR and click on return to open the temporary folder.
3️⃣ Locate the unsaved Excel file and restore it.
Restore Excel Files from AutoRecovery
Another intuitive method of restoring an unsaved Excel file is to restore unsaved Excel file Mac from AutoRecovery.
If your AutoRecovery file is hidden, you must make it perceptible before retrieving the Excel files that are not saved properly.
The following are processes to follow:
1️⃣ Locate applications and click on utilities, then terminal.
2️⃣ Type and open defaults write com. apple. Finder AppleShowAllFiles and click on return to display all items.
3️⃣ Click Finder then return.
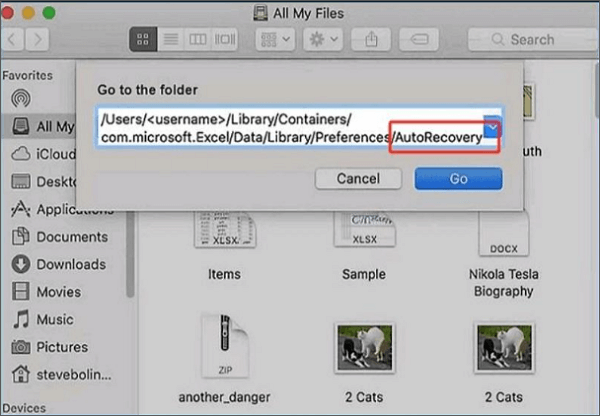
4️⃣ Then, you need to type and open the following command:

5️⃣ After that, click on “Go” to open the AutoRecovery folder.

How to Restore Unsaved Excel Files on Mac Using Excel Built-in Tool
After discussing how to recover Excel file not saved on Mac using the default features of the device, it is important to also elucidate how to recover these unsaved files via the Excel built-in tool. Below are the techniques required:
Get Excel Files from a Recent Workbook
Recovering unsaved Excel files through the recent workbook is also a practical solution for Mac users. You are able to find the recently opened files here and it gives you the option to resume previous work on Excel.

You can find it under “recent” in the File tab, and the following steps help you get Excel files from a Recent Workbook:
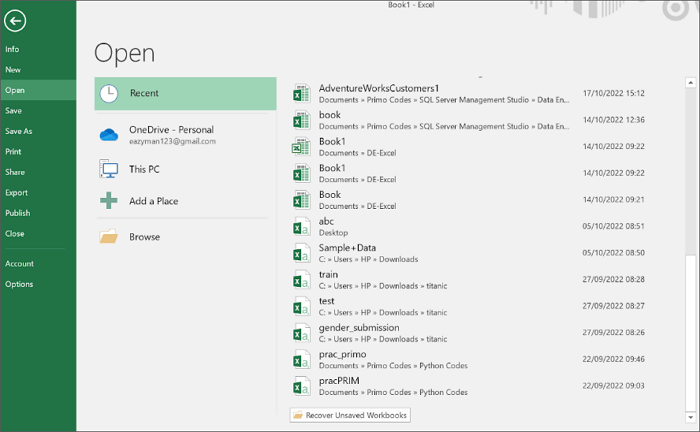
1️⃣ Launch Microsoft Excel and open the file tab located at the top right corner of the computer screen. Choose and click on “open” from the available options.
2️⃣ A pop-up menu appears. Locate the “Recent Workbooks” option and click on it.
3️⃣ A list of unsaved Workbooks appears. Locate the one you want to recover and double-click to open it.
4️⃣ Click on the “Save as” option in the file menu to save the file immediately.
Recover Excel from Version History
If you’ve tried recovering unsaved files via the Recent Workbook method and still not getting it, you can try to recover your unsaved Excel file through the version history.

The following are procedures to follow:
1️⃣ Open the file you would like to recover.
2️⃣ Click on the title of the file and choose version history.
3️⃣ In a distinct window, select a version to open it.
4️⃣ Click on restore and it recovers a previous version instantly.
How to Recover Excel Files Not Saved on Mac from Automatic Backup
Different methods on how to recover unsaved Excel files have been discussed. In this part, we will talk about how to recover unsaved Excel files from Mac via automatic backup.
Restore Unsaved Excel Files from Time Machine
You must have a Time Machine backup disk on your Mac to make use of this method. Follow these guidelines carefully to restore the file through Time Machine:
1️⃣ Connect your MacBook and your Time Machine backup disk.
2️⃣ Locate the folder that had the unsaved Excel document. In the menu bar, click on the Time Machine icon.
3️⃣ Then, find the unsaved document you want to restore and click on “restore” to recover it.
Recover Unsaved Excel Documents from Cloud Storage
If you’ve connected your MacBook to any online Cloud storage, it is a plus for you. These Cloud storage include OneDrive, iCloud, and Google Drive.
- iCloud
Log in to your account and navigate to settings. Then, click on advanced and then, restore files. Locate the Excel file and click on the restore file.
This blog will show you how to log in to iCloud and back up your data step by step: >> How to Sign Into iCloud for Data Backup & Sync
- Google Drive
Access Google Drive through your Google account. Open trash and locate the unsaved Excel file. Right-click on the file and select “restore” to recover the file on your MacBook.
It’s also possible to download files from Google Drive to an external hard drive, which means you can save the documents on other storage devices to avoid losing the Excel document again.
- OneDrive
Access your OneDrive account and navigate to the recycle bin. Then, find the unsaved Excel file, right-click on it, and select “restore” to recover it.
How to Recover Unsaved Excel Files on MacBook Using Third-Party Software
ONERECOVERY is a reliable third-party software for unsaved Excel file recovery on Mac. It can be used to recover unsaved Excel files on your MacBook. It’s designed with a superb and User-friendly Interface which makes it easy to recover any lost or unsaved files on macOS.
This is an incredible free recovery tool that guarantees 95% accuracy on every data scan and recovery. In addition to that, its strong compatibility is also worth noting. ONERECOVERY works effectively with different Apple silicons, like M1, M2, and T2 as well as different macOS versions, such as macOS Sonoma, Ventura, and Monterey.

Only 3 simple steps are required for recovering unsaved Excel on Mac using ONERECOVERY. Follow this tutorial to get your documents back.
Step 1. Launch ONERECOVERY on your Mac, and you need to choose the folder to recover your data.
Step 2. Choose from the 2 scan models, i.e., Quick Scan and Deep Scan. Then, this software will scan the storage space of your device to find the lost file.
Step 3. Preview the files in the scan result and select the document you need to retrieve. Then, click on the “Recover” button to get the Excel file back.
If you are also interested in the method of recovering Excel documents using ONERECOVERY on Windows, this tutorial will be what you need: >> How to Recover Unsaved or Deleted Excel Files on Windows 10/11
Conclusion
Finally, seven different methods that explain how to recover unsaved Excel file Mac have been discussed. These methods range from Temporary folder, AutoRecovery, Excel Built-in tool, Recent Workbook, Version History, Automatic backup via Time Machine and Cloud Storage, and third-party software.
Despite all these methods, a reliable third-party software – ONERECOVERY was recommended and the characteristics and efficiency of this software have been buttressed. The software recovers any unsaved Excel files on MacBook devices; it is a perfect choice for macOS users.
FAQs About the Unsaved Excel File Recovery on Mac
If you want to discover the answers to frequently asked questions about recovering unsaved Excel files on Mac, this part is for you.
For Windows, the Excel files are in the unsaved Workbooks. It can be accessed when you go to file, then click on “info,” then |manage document” where you will find the unsaved Workbooks.
For Mac, it is in the AutoRecovery folder. The folder can be accessed through Data> Library> Preferences and AutoRecovery. Click on ‘Go’ to access Excel’s AutoRecovery folder.
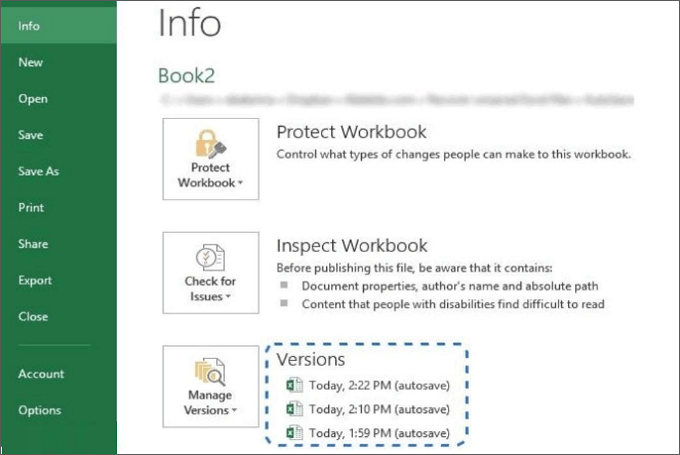
Finding autosaved documents in Excel isn’t complex because Excel saves previous versions of the Workbook automatically at specific intervals. Locate the “File tab” and open it. Find “info,” located at the left Pane, and click on it. Beside the ‘manage version button’ you will find all the autosaved versions of the Excel document.
Vanessa is a professional editor with a strong foundation in computer information technology. Since graduating, she has dedicated her career to create content in IT fields. In the past three year, she has accumulated sufficient knowledge in data recovery, computer problems troubleshooting and application of multimedia software.
She has been trying her best to bridge the gap between complex technical concepts and accessible, reader-friendly content.


