Nintendo is not only a game console producer but also a famous game developer. Nintendo Switch is a famous game console that was released in March 2017. You can play amazing games on this platform.
Although Nintendo Switch brings so much happiness to users, many of them may experience the same frustrating moment: a promising game or a must-have update is just out of reach due to insufficient storage space.
If you happen to be facing this storage issue, this blog will be helpful for you. We will talk about how to get more space on Switch with different methods. Keep reading to know more.
How Much Storage Does the Nintendo Switch Have
There are a lot of people who feel curious about the reason why the storage space of Nintendo Switch is very low. In fact, the Switch is designed to be portable and versatile so the producer Nintendo adopted the flash memory in this console. However, the usage of flash memory also contributed to the limited onboard storage of 32 GB, which is not enough for most deep players.
How to Get More Space on Switch
There are several options for Nintendo Switch storage expansion. You can get more storage space on your console with or without an SD card. Follow these methods to do that now.
Method 1. Get More Storage on Switch by Clearing Necessary Data
As mentioned above, the storage space of Nintendo Switch is limited to 32GB, which is not sufficient for many users. This limited internal storage can be quickly filled up as the size of modern game files, updates, and downloadable content is huge.
If you need to delete some files from your console, the following methods are optional.
1️⃣ Game Management
First of all, you need to evaluate the game library on your Nintendo Switch and uninstall titles that you’ve completed or no longer play regularly.
This method can not only free up Switch’s storage space but also help you streamline your gaming menu for a more organized experience.
Tutorial of removing games on Switch:
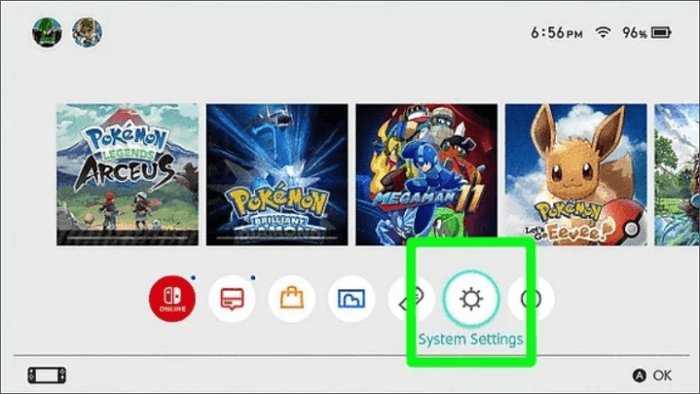
Step 1. Go to the Home Menu > select System Settings.
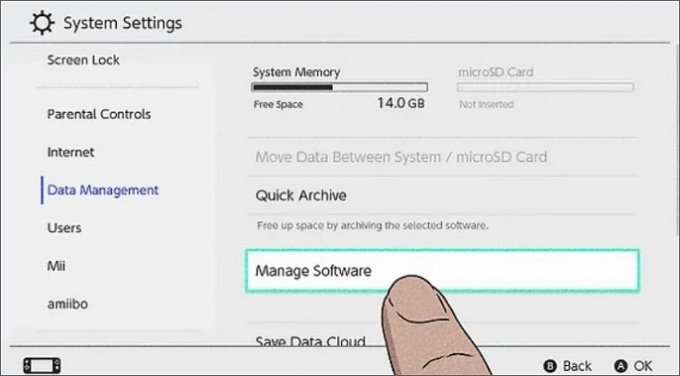
Step 2. Select Data Management > click Manage Software.
Step 3. Delete the game that you don’t use any longer.
Step 4. Choose Delete Software to remove the game, including all the data, or Archive Software to remove the Delete Software to remove the game but keep the game saves data.
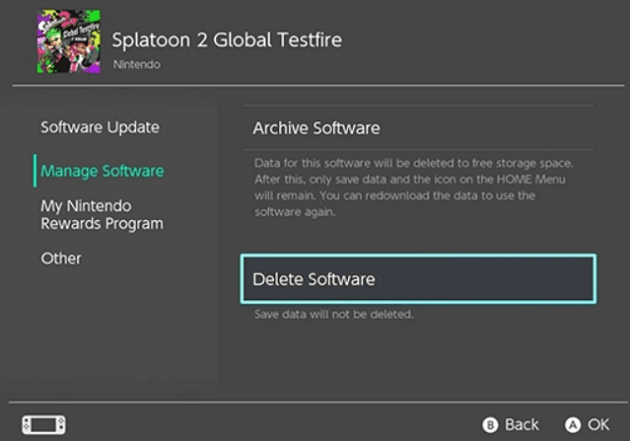
💡 Note: You can also choose the “Quick Archive” option to remove the game that you won’t play for a while. The difference is that you can re-download the deleted game directly by selecting the software icon on the HOME Menu.
2️⃣ Remove Unnecessary Screenshots and Videos
Almost every Switch user has captured memorable gaming moments by taking a screenshot a recording a video. That is a good way to keep your precious memories. However, as time goes on, more and more screenshots and videos will consume substantial storage space and even hinder game downloading and game updating.
It’s recommended to regularly transfer the screenshots and videos to a microSD card or other storage device to ensure there is enough space on your Nintendo Switch.
How to get more space on switch by deleting screenshots and videos:
Step 1. Go to the Data management.
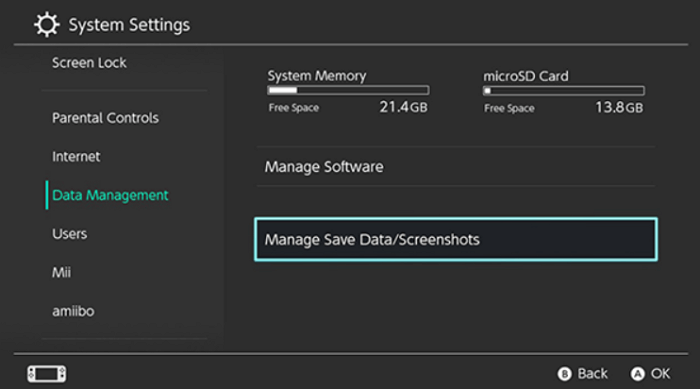
Step 2. Select Delete Save Data or Manage Screenshots.
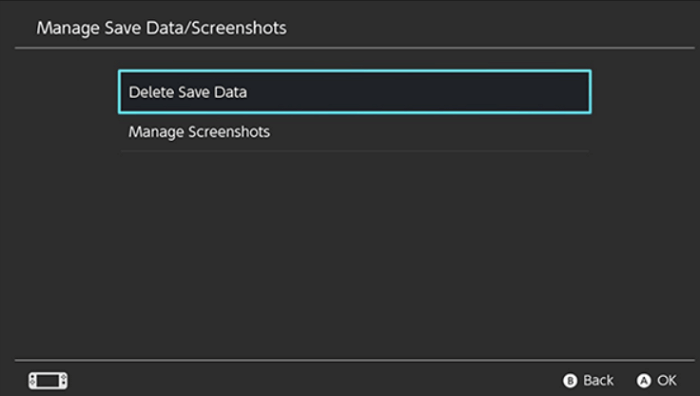
Step 3. Delete which one that you want to remove.
3️⃣ Clear Old System Data
Besides deleting games and screenshots, some other files are easy to overlook. For example, if you use the internet browser in Nintendo Switch, the cookies and cache will be stored on your console. As these files are accumulated, a good deal of storage space will be consumed.
Check and clear these files on your Switch.
eShop Downloads Queue: If you cancel or interrupt the downloading process, the residual game data will be kept on your Switch. So don’t forget to access the eShop to clear the download queue and eliminate lingering data.
System Updates and Logs: During the gameplay, system updates and log files will be generated. After using this Switch for a long time, these logs will occupy a lot of storage space. That is why we recommend you check and clear the system data periodically.
Method 2. Utilize Nintendo Switch Extra Storage on Another Console
It will be extremely easy to ensure sufficient storage space on your Nintendo Switch if you have more than one Switch console. Nintendo provides users with an ingenious solution to share extra storage between your consoles seamlessly.
The steps to transfer your game data to another device:
Step 1. Prepare for the Transfer
- You should have both the source and destination consoles to hand.
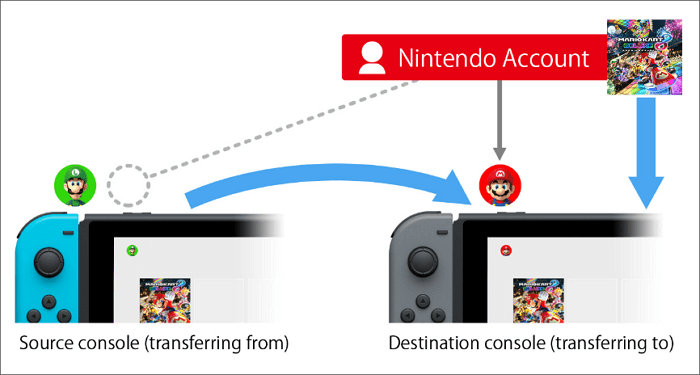
- Make sure the user you want to transfer is linked to a Nintendo account.
- Installed the latest system version on the device.
- Make sure the AC adapter is connected while the transfer is taking place.
- When the first-time setup on the destination console shows the pic, select Import User Data from Another Console.
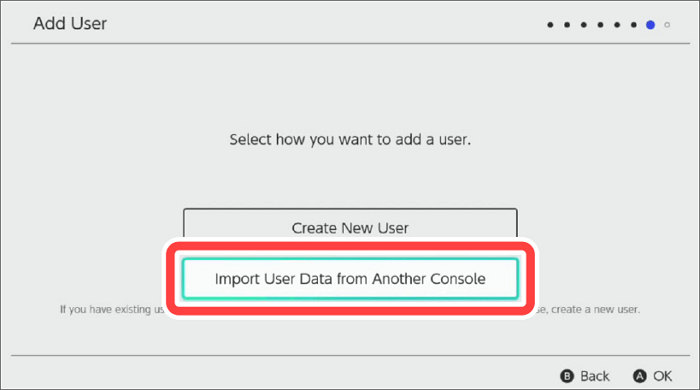
Step 2. Carry Out the Transfer
- Select System Settings on the Home menu.
- Select Users.
- Select Transfer Your User Data.
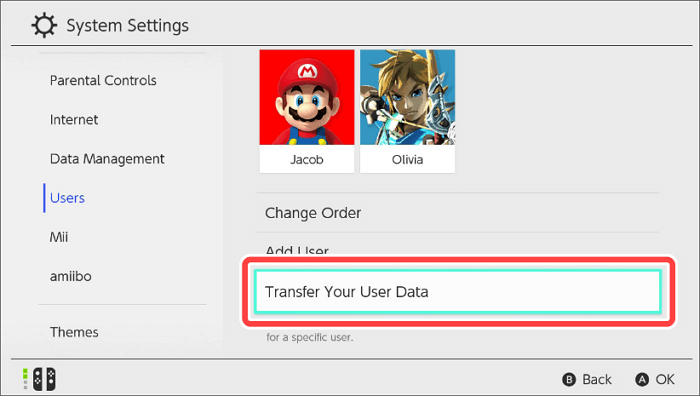
- Follow the instructions.
Method 3. Use SD Card for Nintendo Switch Storage Expansion
It is a relatively simple method to upgrade your Nintendo Switch storage. Here is how to do it. If you don’t have an SD card in your Nintendo Switch, buy a new one and insert it into the device. Here is how to do it.
Step 1. Turn off your Nintendo Switch. Remove any game cartridges.
Step 2. On the back of the game console > locate the micro SD card slot.
Step 3. Insert the micro SD card into the slot.
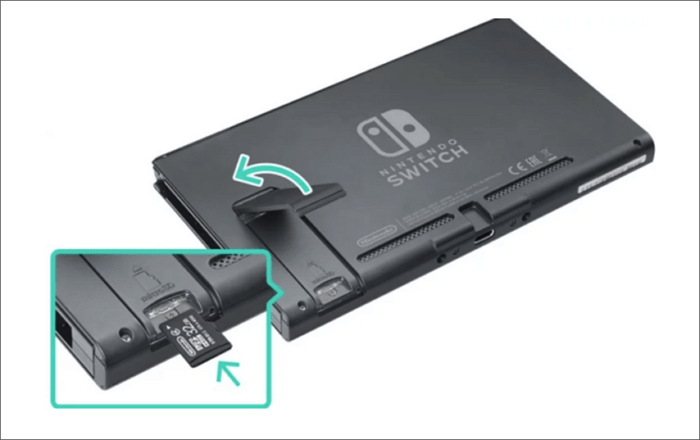
Step 4. Turn on the Nintendo Switch > go to the system settings menu.
Step 5. Scroll down and select Data Management.
Step 6. Choose Move Data Between System/microSD Card (if you don’t insert the SD card, this option will not be selectable.)
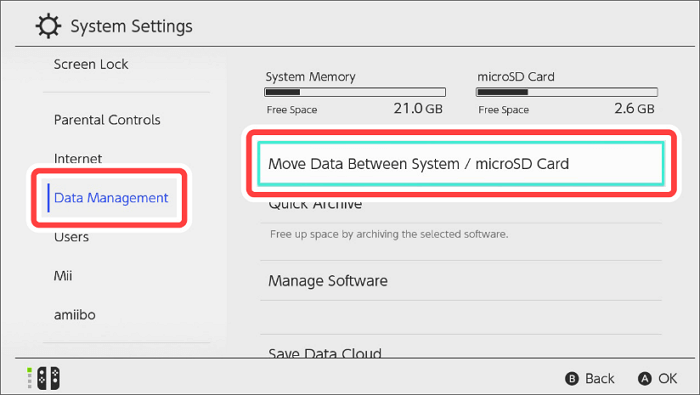
Step 7. Select Move to a micro SD card to transfer the data from the system memory to the micro SD card. (in a similar way, if you want to transfer data from the micro SD card to the system memory, select Move to System Memory.)
Step 8. Wait for the whole process to end.
If you are using a micro SD card on your Switch but the storage capacity is still not enough, perhaps what you should do is replace a larger micro SD card.
For example, if you use a 1GB SD card, you can change it into a bigger one like 1TB. There are a lot of options in the market. And this is the best way to do it.
💡 Note:
- Nintendo Switch only supports micro SD cards.
- The max size Nintendo Switch SD card is up to 2TB. Nintendo Switch is compatible with microSD, microSDHC, and microSDXC.
- You don’t need to expand your SD card directly to 2TB. Just buy what you need. If you download games regularly, a normal one like 128GB or 256GB will meet your demands. But if you are a deep user, consider a 2TB for your Nintendo Switch saver.
Which microSD Cards are Supported on Switch?
Nintendo Switch is compatible with microSD, microSDHC, and microSDXC, and you can choose from these types of memory cards according to their storage capacity.
microSD: The capacity is up to 2 GB and can be suitable only for basic storage needs. If you have a limited budget or don’t plan to store many games, a standard microSD card may be enough.
microSDHC: The storage capacity of microSDHC ranges from 4 GB to 32 GB. The relative storage space makes it suitable for moderate gaming and users who occasionally download games and updates.
microSDXC: With a storage capacity ranging from 64 GB and going up to 2 TB, microSDXC cards are well-suited for those who plan to have a large number of games and multimedia content.
Bonus Tip: How to Recover Important Game Data on Switch
Although it’s very helpful to free up storage space on your Switch by clearing unnecessary files, sometimes this operation can also lead to the accidental deletion of important game files. To avoid this issue, it would be better to check the files you want to delete for many times.
But you don’t have to worry too much as some powerful data recovery software is available. Among all these optional recovery tools, ONERECOVERY is the one that is worth mentioning. If you backed up the Switch data on a computer, this software can restore what you need with simple clicks.
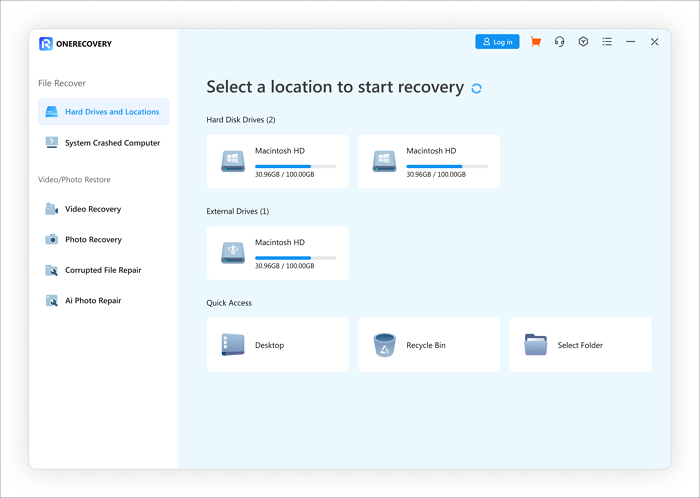
Key Features:
☑️ Support data recovery on various storage devices, like external hard drives.
☑️ Retrieve lost or deleted files in different common formats.
☑️ Recover deleted files on Mac and Windows.
☑️ High success rate of data recovery.

Conclusion
In this guide, we have explained the reason why the storage of Nintendo Switch is low and given you some methods to expand your Nintendo Switch storage space.
In addition to that, we also introduced several common types of memory cards for Switch and offered you the solution to accidental deletion of important game data. All in all, you will solve the storage issues of Switch without effort.
FAQs About Nintendo Switch Storage Expansion
These FAQs will answer many of your questions about how to get more storage on Nintendo Switch. Read to get more information.
Are all microSD cards compatible with the Switch?
No, some cards are incompatible with the Switch, and the performance may not be good cause they are not designed for games.
How much storage do I need for my Nintendo Switch microSD?
Generally speaking, For moderate use, a 32GB or 64GB microSD card will work. A 256GB SD card will meet your need for about 20 games on your Nintendo Switch. But, if you are a hardcore player, you might need to a larger, well, that depends on yourself.
Can you expand Switch storage?
You can expand the storage space on your Nintendo Switch by purchasing a microSD card.
Checking available free space?
You can check your Nintendo Switch’s available storage space.
Step 1. Go to the system settings.
Step 2. Go to the data management on the home menu.
You May Also be Interested in:
How to Fix Corrupted Data on PS5
How to Recover Lost Saved Game Data on PS5
How to Fix Steam Deck Cloud Sync Error
Vanessa is a professional editor with a strong foundation in computer information technology. Since graduating, she has dedicated her career to create content in IT fields. In the past three year, she has accumulated sufficient knowledge in data recovery, computer problems troubleshooting and application of multimedia software.
She has been trying her best to bridge the gap between complex technical concepts and accessible, reader-friendly content.


