PlayStation 4, or PS4 for short, has become one of the most popular gaming consoles now. But at the same time, many of the gamers have once reported different kinds of errors. For example, a player posed a question in the Reddit forum that how to fix the PS4 CE-34335-8 error.
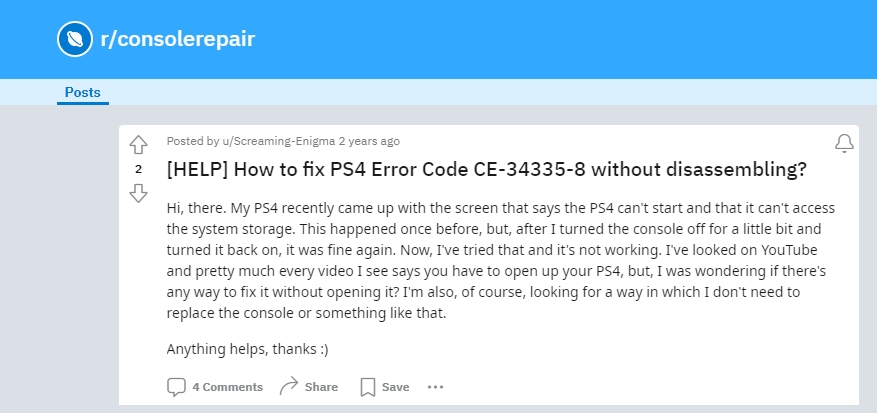
The CE-34335-8 error refers to the “PS4 Cannot Access System Storage” error. If you have the same problem, you should not miss this post. Here we will explain the underlying causes and then guide you through the useful fixes. Let’s read on and find the answer to the question!
What Causes the PS4 Cannot Access System Storage Error
“Cannot access system storage” is a common PS4 error message that usually shows up when you turn on the console. It is telling you that your PS4 fails to detect the hard drive you just inserted. According to StarzSoft, the possible reasons that result in this issue generally include:
- Your hard drive may be not connected properly to the device and you have to check the connection.
- Your hard drive may get damaged due to physical impact or exposure to extreme conditions.
- Your hard drive may be nearly full and not have enough space to store new data.
- Your system may be corrupted or lose essential files so this error occurs.

You can fix the PS4 Cannot Access System Storage error with professional software or programs. However, in some cases, you may have to disassemble your device to accomplish repair finally. Let’s move to the next part to know what solution you should adopt.
How to Fix the PS4 Cannot Access System Storage Error
Based on the PlayStation official instructions, here we provide some effective solutions to fix the PS4 Cannot Access System Storage error. Considering the difficulty, we recommend you first try out the methods with no need to disassemble them one by one as the CE-34335-8 error on your PS5 is likely to be addressed at this stage.
Solutions Without Disassembly
Solution 1: Restart Your PS4
In many instances, a simple restart can help you resolve the PS4 Cannot Access System Storage error. Follow the steps below to reboot your PS4 correctly:
- Turn off your PS4 by holding down its power button until the device beeps twice.
- Unplug the power cable, HDMI cable, and any other cables connected to your PS4 from the socket.
- Reconnect these cables after a few minutes.
- Reboot your PS4 to check if it still throws the CE-34335-8 error.
Solution 2: Initialize Your PS4 in the Safe Mode
If a restart cannot help you, you can try initializing your PS4 in the Safe Mode. PS4 Safe Mode is a troubleshooter for your console. When you launch your PS4 in the Safe Mode, it will provide you with a list of utilities to troubleshoot different issues, including initializing your PS4. This function is used to reset your console to its original state and delete all the data. Through initializing the settings, the fault on your system can be cleared. To achieve this, follow the steps shown below:
- Use a USB cable to connect your PS4 controller to your console.
- Press the power key on the console and hold it for a while. You should hear a beep twice, which indicates your PS4 has been in the Safe Mode.
- Select the “Initialize PS4” option from the menu using the down-arrow key.
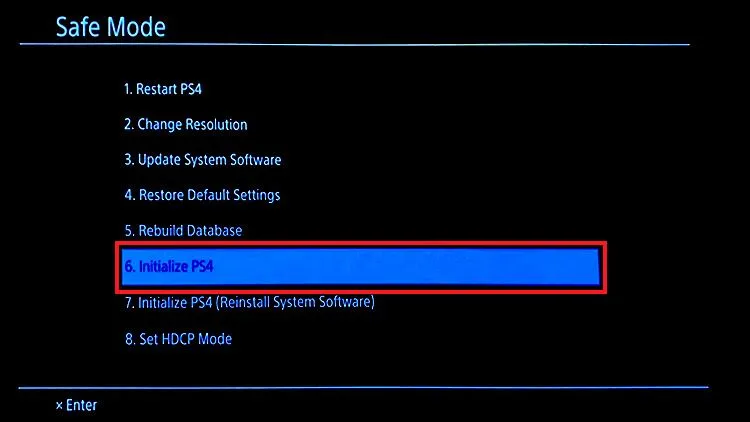
- Now you can turn on your controller as usual and see if the error persists.
Solution 3: Rebuild the Database
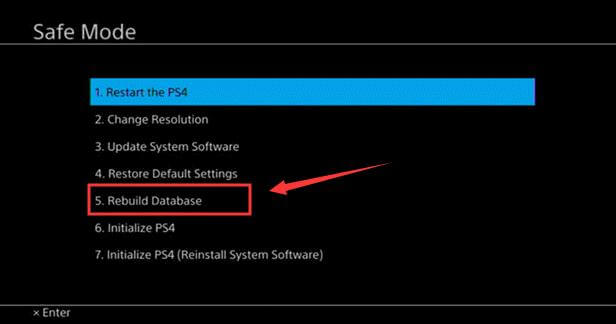
Sometimes the reason why your PS4 cannot access system storage is probably your file system falls in a mess or gets stuck, so restarting or re-initializing your device might be of no use. In this case, rebuilding the database may come in handy because it can remove any junk files in your system and rearrange the remaining files without losing any data. The steps to rebuild the database are quite simple:
- Press and hold the power button on the console to enter the Safe Mood.
- Connect a controller to your console and navigate to the “Rebuild Database” option.
Solution 4: Use the CHKDSK Command
If you assume that there is something wrong with the system to makes your PS4 unable to access the system storage, such as a bad sector, you can consider using the CHKDSK command to fix it. As a command-line utility, CHKDSK can check the file system problems of a hard drive or disk partition and work to fix them if possible. Below are the steps to fix the issue with this tool:
- Start by connecting your PS4 to a computer using a USB cable.
- Press the Windows icon and type “cmd” in the search box to open the Command Prompt utility.
- When you come into the Command Prompt window, type in “chkdsk *: /r /f” and press the Enter key. Here “*” stands for the drive letter.
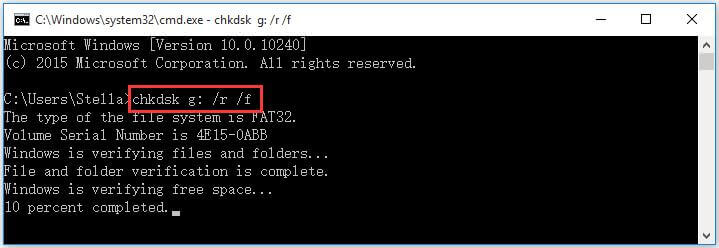
- Once done, CHKDSK immediately begins checking your disk. If there are errors, it will attempt to fix them.
- When the process is complete, remove the hard drive from the computer and insert it into your PS4 again. Now reboot the device to see if the issue is addressed.
Solutions Requiring Disassembly
Solution 1: Format Your PS4 Hard Drive
If the above methods do not work, your hard drive might be faulty or corrupted, and thus you need to format your disk to get it to return to normal. This way is effective in resolving PS4, which cannot access system storage issues unless your drive is physically damaged. Here’s how to format your hard disk:
- Turn off your PS4 and unplug it from the power source.
- Carefully dismantle the cover of your hard drive and remove the drive from your PS4.
- Insert the hard drive into a computer.
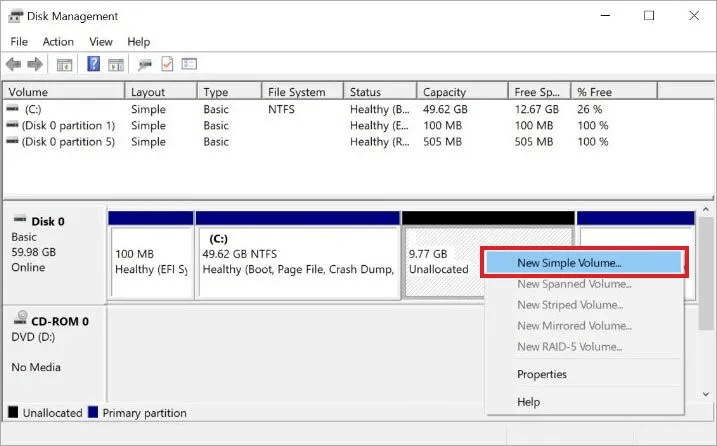
- Make your way to the Disk Management program and locate your drive in the unallocated or RAW area.
- Right-click on your disk and select the “New Simple Volume” option from the drop-down menu.
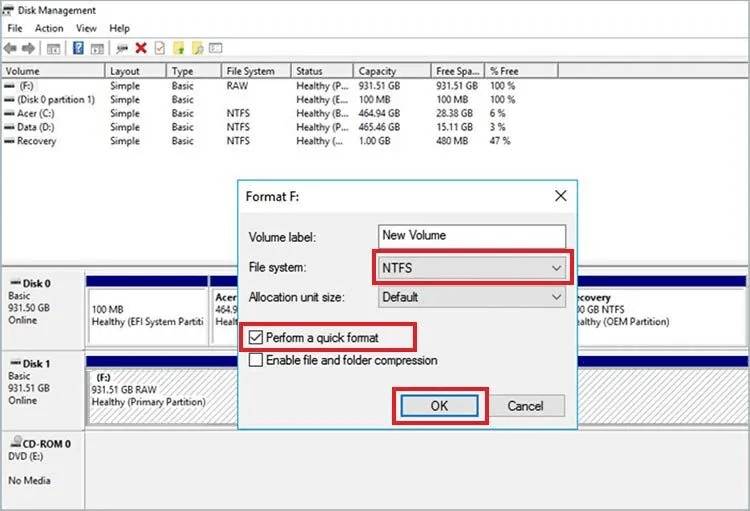
- In the pop-up dialog, specify a name for your drive in the “Volume label” field, choose your desired file system, and select the “Perform a quick format” checkbox. After that, click “OK” to start formatting.
- After the formatting process is finished, unplug the hard drive from the computer and reinsert it into your console.
- Now turn on your PS4 and follow the on-screen instructions to set it up again.
To offer you clearer guidance, here is a video tutorial about how to format a PS4 hard drive on the PC:
Solution 2: Replace Your PS4 Internal Hard Drive
If you still face the PS4 Cannot Access System Storage error after performing all the aforementioned solutions, you should take replacing the internal hard drive with the external hard drive into consideration because your drive must suffer severe damage. The process is somewhat complicated but there is no other choice. Please follow the below instructions step by step:
1. To replace the internal hard drive, you should first prepare some necessary items listed below:
- A screwdriver.
- A computer with Internet access.
- A portable storage device whose free space is a least 1 GB, for example, a USB flash drive.
- A PS4 full-size system. Models CUH-1000 to CUH-1200 or model CUH-1215 are preferred.
- An officially supported replacement hard drive. To confirm what type you can use for your console, you can either check with the PlayStation official website or look through the manual that came with your product.
If you would like, you can also prepare a compressed air spray and even a microfiber cleaning cloth to clean your new drive and its position before it is put into the console.
2. Back up your PS4 data using your portable storage device. Following the official guidelines, here are the specific steps to take a backup:
Step 1: Plug the storage device into your PS4.
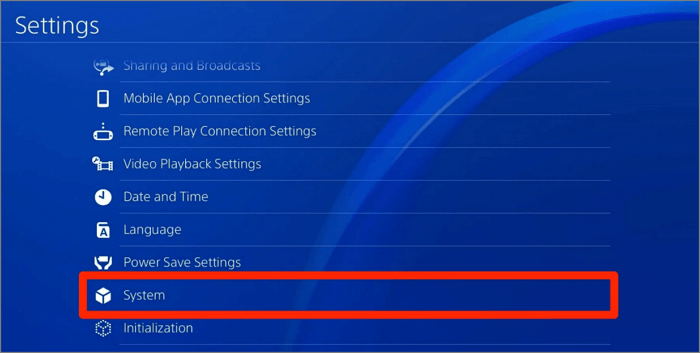
Step 2: Go to Settings and select “System” from the list.
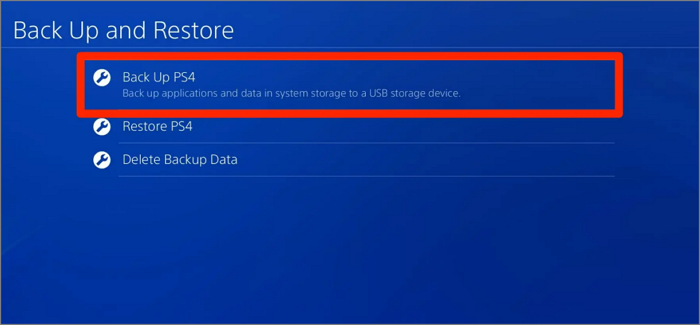
Step 3: Navigate to “Back Up and Restore” and click on the “Backup PS4” option.
Step 4: Now select the data you wish to back up and click “Next”.
Step 5: Give a name to the backup.
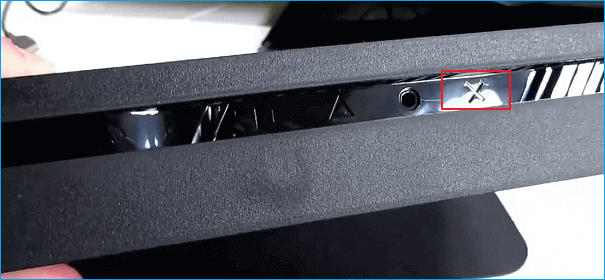
Step 6: Then click “Back Up” and press the “X” button as shown below.
Step 7: Wait for the backup process to be accomplished and then safely remove the external device from the system.
Step 8: Now you can simply replace the damaged disk with a new one in line with the steps as follows:
- First, you must ensure that your PS4 is entirely off.
- Remove the cover and take away the old internal hard drive with a screwdriver.
- Now you can use your compressed air spray and microfiber cleaning cloth to clean the empty position and the new compatible disk that you have prepared previously.
- Then replace the old part with the new drive. Make sure it is secured well by your screwdriver.
After you replace the internal hard disk successfully, you can copy the backup data from your external storage device to your current PS4 system. Note that you should use the same account to sign in to the device during the process.
If you are still not so clear about what you should do during the replacement, you can watch the detailed video tutorial:
FAQs
Why my PS4 cannot connect to the network?
Several issues can result in a PS4 not connecting to WiFi or other internet. They generally include:
- You may be attempting to connect with an invalid username or password.
- Your network may be poor or unstable because of distance or other interference.
- The PlayStation Network (PSN) may be offline temporarily.
- Your WiFi router may not be connected properly or having other connectivity issues.
- The DNS settings of your PS4 may be incorrect and you need to reset them.
- How to fix the PS4 “Cannot continue using the application” error?
Why my PS4 “Cannot continue using the application”?
The PS4 “Cannot continue using the application” error indicates that the data on the application is damaged or corrupted. If you are seeing this error on your PS4, you can try the below four common solutions to address this issue.
1. Clean up Your PS4
As time goes by, dust will pile up on your PS4 and influence the normal operation if you do not clean it regularly. After turning off the console, you can remove the internal hard drive and other parts and then clear the dust with a clean and soft cloth and a compressed air spray.
2. Clear Cache
Clearing the cache can free up some space on your system to help it run more smoothly, thus allowing the application to continue working.
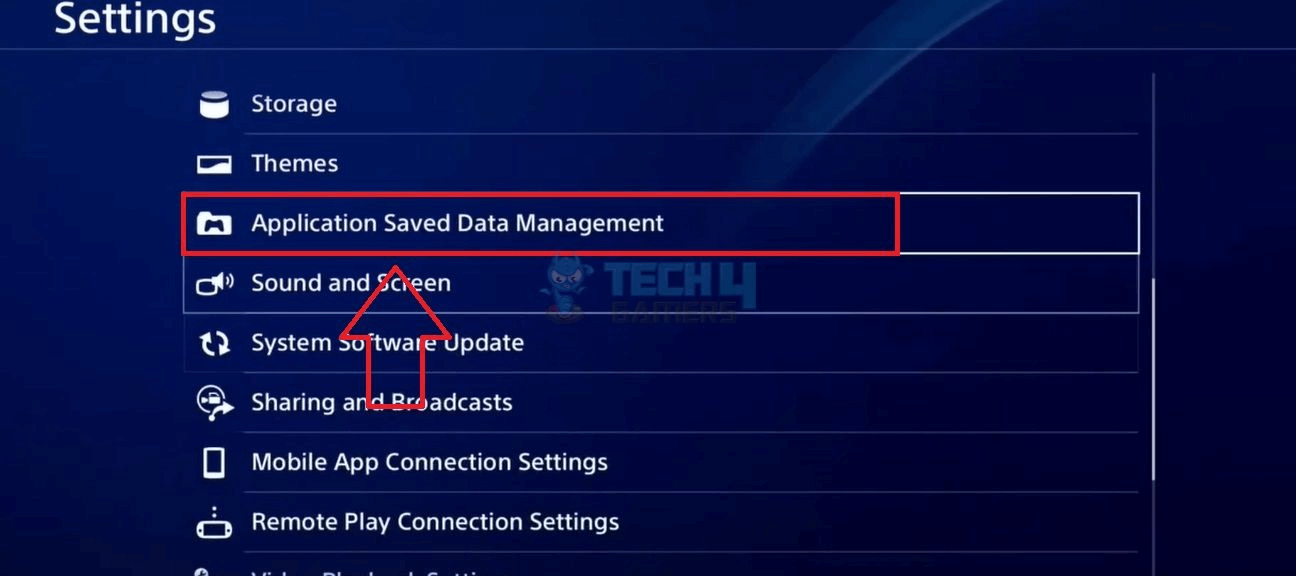
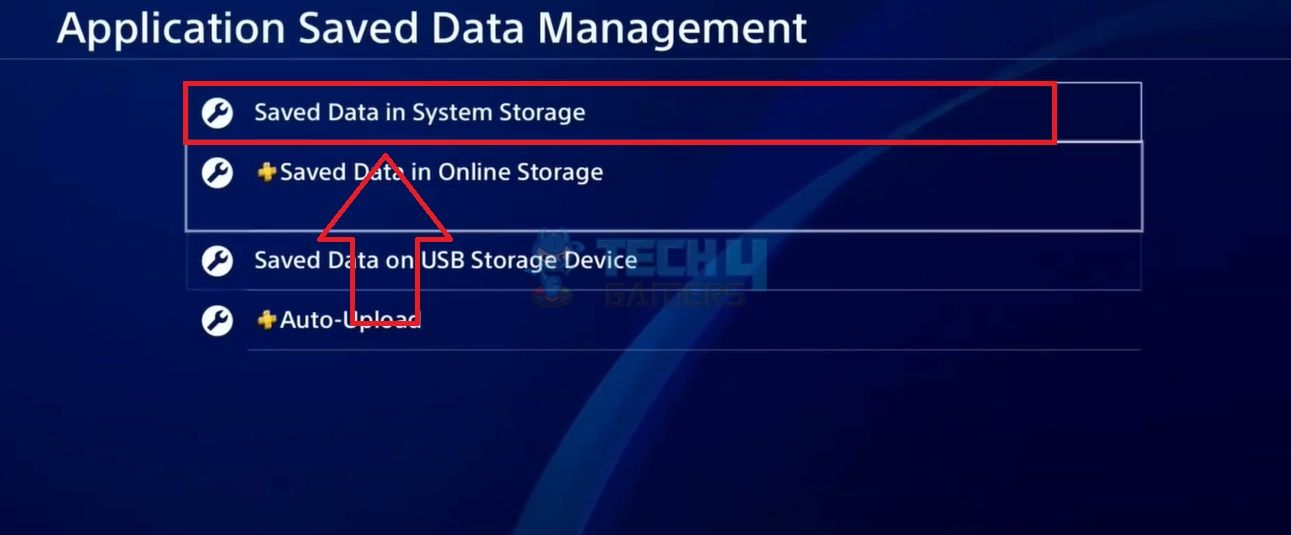
Step 1: Navigate to the Settings menu and click on “Application Saved Data Management”.
Step 2: Select the “Saved Data in System Storage” option from the list.
Step 3: Click the “Delete” option to start the deletion.
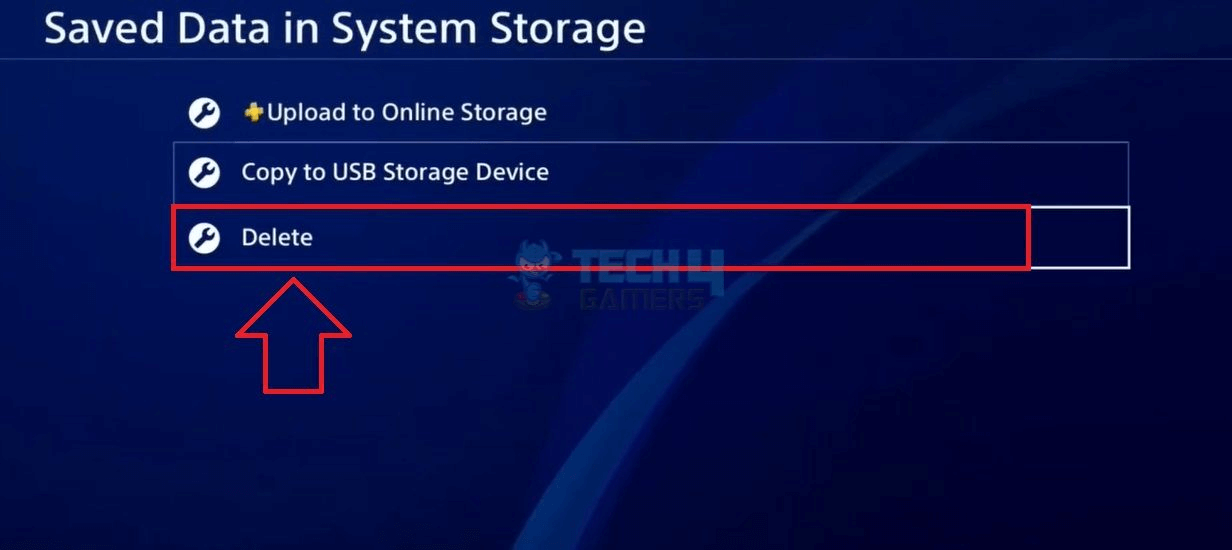
Step 4: Select the games you would like to clear their cache and then press the “Delete” button.

3. Rebuild Database
If the first solution does not help, you may need to rebuild your database to fix the error. Here are the detailed steps:
Step 1: Connect your controller to your PS4 console.
Step 2: Hold down the power button on the front panel of the console to access the Safe Mode.
Step 3: Select the “Rebuild Database” option from the menu under Safe Mode.
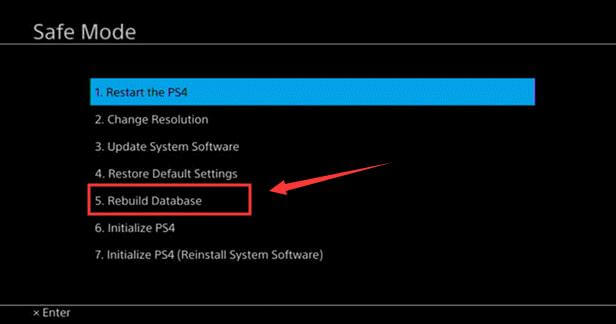
Step 4: After the rebuilding process is complete, restart the console and try loading your game.
Step 5: Initialize Your PlayStation 4
4. If the error persists, you should consider initializing your PS4, whose process is similar to rebuilding the database.
Step 1: Connect the PS4 controller to the console.
Step 2: Go to the Safe Mode by pressing and holding the power button.
Step 3: Click “Initialize PS4” from the menu and then wait for the process to be finished.
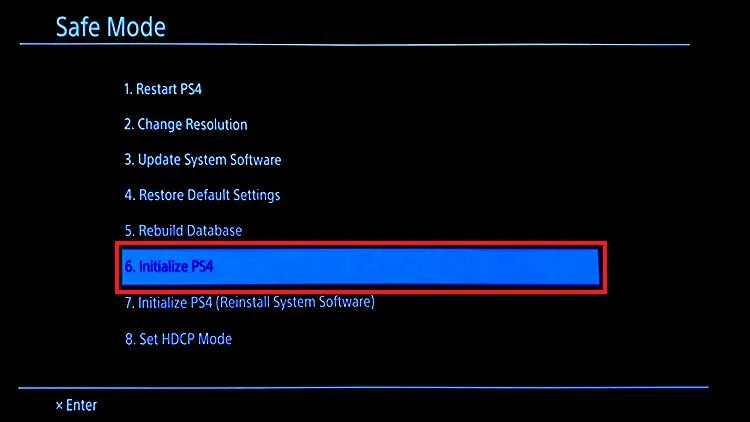
How can I fix my unbootable PS4?
As a myriad of issues can lead to an unbootable PS4, there are various methods to fix this problem. The common effective solutions are as follows:
1. Check All the Cables and Wall Outlet
It is of great importance to make sure all the cables for your PS4 are well connected and do not get faulty, including the power cable, USB cable, and HDMI cable. To check that, you can try disconnecting these cables and reconnecting them a few minutes later or plugging them into different ports and sockets. If these two ways do not work, replace them with new ones and then restart your PS4 to see if the “PS4 not turning on” error still exists.
In the meantime, you should also check whether your wall outlet is faulty because it can be a potential reason for your PS4 not turning on. The way to verify this is nearly the same as above. If you find your outlet is loose from the wall or even does not work, you must instantly replace it with a new one or let an electrician have a check.
2. Restart PS4 in the Safe Mode
If the above solutions are unable to fix the error, there are probably some technical glitches with your PlayStation 4. Under this circumstance, you can consider restarting your PS4 in Safe Mode. Here’s how to do it the right way:
Step 1: Connect the controller to the console using a USB cable.
Step 2: Hold down the power key on your console until you hear two beeps and then release it. Your device should launch the Safe Mode now.
Step 3: Select the “Restart the PS4” option with your controller and wait for the process to be accomplished.
Step 4: Rebuild PS4 Database
If a restart cannot help you, you can try to rebuild your database. Its steps are almost the same as that of restarting your PlayStation 4. Simply run the Safe Mode by pressing and holding the power button, and then select the “Rebuild Database” option on the screen. When the process is finished, your PS4 database should be rebuilt successfully.
Conclusion
It can be quite frustrating when the “Cannot access system storage” error appears on your PS4. To offer you strong help, this post first looks into why the error will occur and then guides you through how to resolve it. Here the solutions have been sorted based on difficulty. If the problem on your PS4 is not severe, it may be easily fixed by a restart; but if it is, you may have to try to disassemble the console, and then format the hard drive or even replace it. Hopefully, you will find a suitable method among them to make your PlayStation 4 back to normal eventually. If you have some similar troubles with PS5 or even worse questions about your PS like PS5 data corruption, you can also try some of these methods.

I’m Woody, your go-to guide in the realm of data recovery and computer techniques. With a passion for unraveling tech intricacies, I’m here to share insights, tips, and solutions to empower you in the digital landscape. Feel free to ask me when you meet any problems on this fantastic journey!


